Table Formatting
With GemBox.Document you can specify the formatting options on a table, row and cell programmatically using the TableFormat, TableRowFormat and TableCellFormat classes.
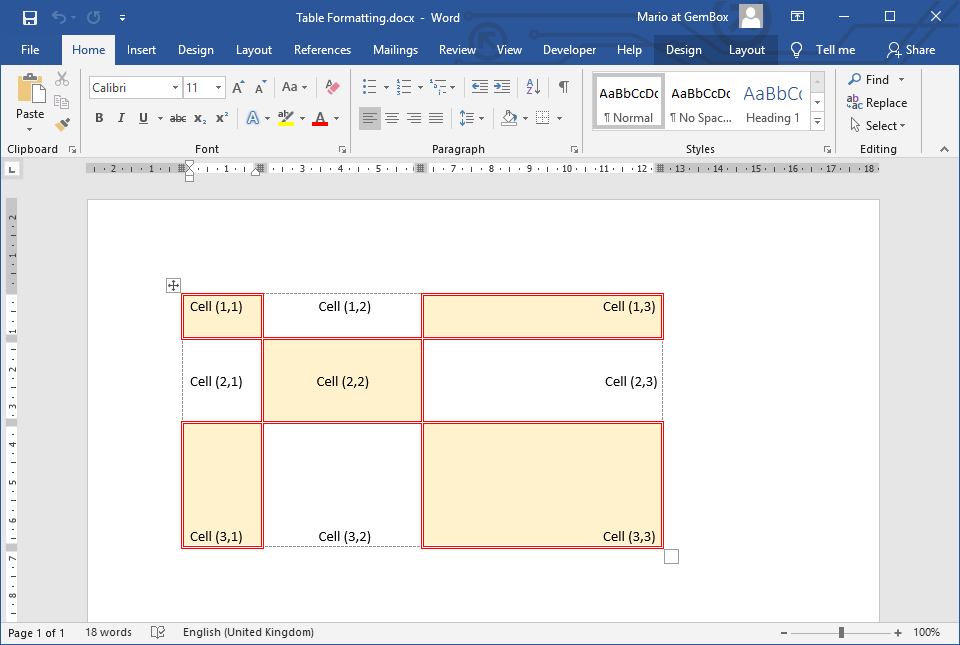
You have various formatting options at your disposal, such as table width, row height, cell alignment, cell spacing and many more.
The following example shows the available table, row, and cell formatting options in the GemBox.Document API.

using GemBox.Document;
using GemBox.Document.Tables;

class Program
{
    static void Main()
    {
        // If using the Professional version, put your serial key below.
        ComponentInfo.SetLicense("FREE-LIMITED-KEY");

        var document = new DocumentModel();

        var table = new Table(document);
        table.TableFormat.AutomaticallyResizeToFitContents = false;

        // By default Table has assigned "Table Grid" style, the same as when creating it in Microsoft Word.
        // This base style defines borders which can be removed with the following.
        table.TableFormat.Style.TableFormat.Borders.ClearBorders();

        // Add columns with specified width.
        table.Columns.Add(new TableColumn(60));
        table.Columns.Add(new TableColumn(120));
        table.Columns.Add(new TableColumn(180));

        // Add rows with specified height.
        table.Rows.Add(new TableRow(document) { RowFormat = { Height = new TableRowHeight(30, TableRowHeightRule.AtLeast) } });
        table.Rows.Add(new TableRow(document) { RowFormat = { Height = new TableRowHeight(60, TableRowHeightRule.AtLeast) } });
        table.Rows.Add(new TableRow(document) { RowFormat = { Height = new TableRowHeight(90, TableRowHeightRule.AtLeast) } });

        for (int r = 0; r < 3; r++)
            for (int c = 0; c < 3; c++)
            {
                // Add cell.
                var cell = new TableCell(document);
                table.Rows[r].Cells.Add(cell);

                // Set cell's vertical alignment.
                switch (r)
                {
                    case 0:
                        cell.CellFormat.VerticalAlignment = VerticalAlignment.Top;
                        break;
                    case 1:
                        cell.CellFormat.VerticalAlignment = VerticalAlignment.Center;
                        break;
                    case 2:
                        cell.CellFormat.VerticalAlignment = VerticalAlignment.Bottom;
                        break;
                }

                // Add cell content.
                var paragraph = new Paragraph(document, $"Cell ({r + 1},{c + 1})");
                cell.Blocks.Add(paragraph);

                // Set cell content's horizontal alignment.
                switch (c)
                {
                    case 0:
                        paragraph.ParagraphFormat.Alignment = HorizontalAlignment.Left;
                        break;
                    case 1:
                        paragraph.ParagraphFormat.Alignment = HorizontalAlignment.Center;
                        break;
                    case 2:
                        paragraph.ParagraphFormat.Alignment = HorizontalAlignment.Right;
                        break;
                }

                if ((r + c) % 2 == 0)
                {
                    // Set cell's background and borders.
                    cell.CellFormat.BackgroundColor = new Color(255, 242, 204);
                    cell.CellFormat.Borders.SetBorders(MultipleBorderTypes.Outside, BorderStyle.Double, Color.Red, 1);
                }
            }

        document.Sections.Add(new Section(document, table));

        document.Save("Table Formatting.%OutputFileType%");
    }
}
Imports GemBox.Document
Imports GemBox.Document.Tables

Module Program

    Sub Main()

        ' If using the Professional version, put your serial key below.
        ComponentInfo.SetLicense("FREE-LIMITED-KEY")

        Dim document As New DocumentModel()

        Dim table As New Table(document)
        table.TableFormat.AutomaticallyResizeToFitContents = False

        ' By default Table has assigned "Table Grid" style, the same as when creating it in Microsoft Word.
        ' This base style defines borders which can be removed with the following.
        table.TableFormat.Style.TableFormat.Borders.ClearBorders()

        ' Add columns with specified width.
        table.Columns.Add(New TableColumn(60))
        table.Columns.Add(New TableColumn(120))
        table.Columns.Add(New TableColumn(180))

        ' Add rows with specified height.
        table.Rows.Add(New TableRow(document) With {.RowFormat = New TableRowFormat() With {.Height = New TableRowHeight(30, TableRowHeightRule.AtLeast)}})
        table.Rows.Add(New TableRow(document) With {.RowFormat = New TableRowFormat() With {.Height = New TableRowHeight(60, TableRowHeightRule.AtLeast)}})
        table.Rows.Add(New TableRow(document) With {.RowFormat = New TableRowFormat() With {.Height = New TableRowHeight(90, TableRowHeightRule.AtLeast)}})

        For r = 0 To 2
            For c = 0 To 2

                ' Add cell.
                Dim cell As New TableCell(document)
                table.Rows(r).Cells.Add(cell)

                ' Set cell's vertical alignment.
                Select Case r
                    Case 0
                        cell.CellFormat.VerticalAlignment = VerticalAlignment.Top
                    Case 1
                        cell.CellFormat.VerticalAlignment = VerticalAlignment.Center
                    Case 2
                        cell.CellFormat.VerticalAlignment = VerticalAlignment.Bottom
                End Select

                ' Add cell content.
                Dim paragraph As New Paragraph(document, $"Cell ({r + 1},{c + 1})")
                cell.Blocks.Add(paragraph)

                ' Set cell content's horizontal alignment.
                Select Case c
                    Case 0
                        paragraph.ParagraphFormat.Alignment = HorizontalAlignment.Left
                    Case 1
                        paragraph.ParagraphFormat.Alignment = HorizontalAlignment.Center
                    Case 2
                        paragraph.ParagraphFormat.Alignment = HorizontalAlignment.Right
                End Select

                If (r + c) Mod 2 = 0 Then

                    ' Set cell's background and borders.
                    cell.CellFormat.BackgroundColor = New Color(255, 242, 204)
                    cell.CellFormat.Borders.SetBorders(MultipleBorderTypes.Outside, BorderStyle.Double, Color.Red, 1)

                End If
            Next
        Next

        document.Sections.Add(New Section(document, table))

        document.Save("Table Formatting.%OutputFileType%")

    End Sub

End Module
Keep tables on same page
By default, the text editor will split a table in a document between two pages if one or more rows cannot fit on the previous page. But often, there's a need to prevent the splitting of cells by moving the entire row or prevent the splitting of rows by moving the whole table to the next page.
To keep a single row from breaking across pages, you'll need to disable the TableRowFormat.AllowBreakAcrossPages option. With this formatting option, you can avoid page breaks inside the cells of a row, and as a result, the table will only split between rows.
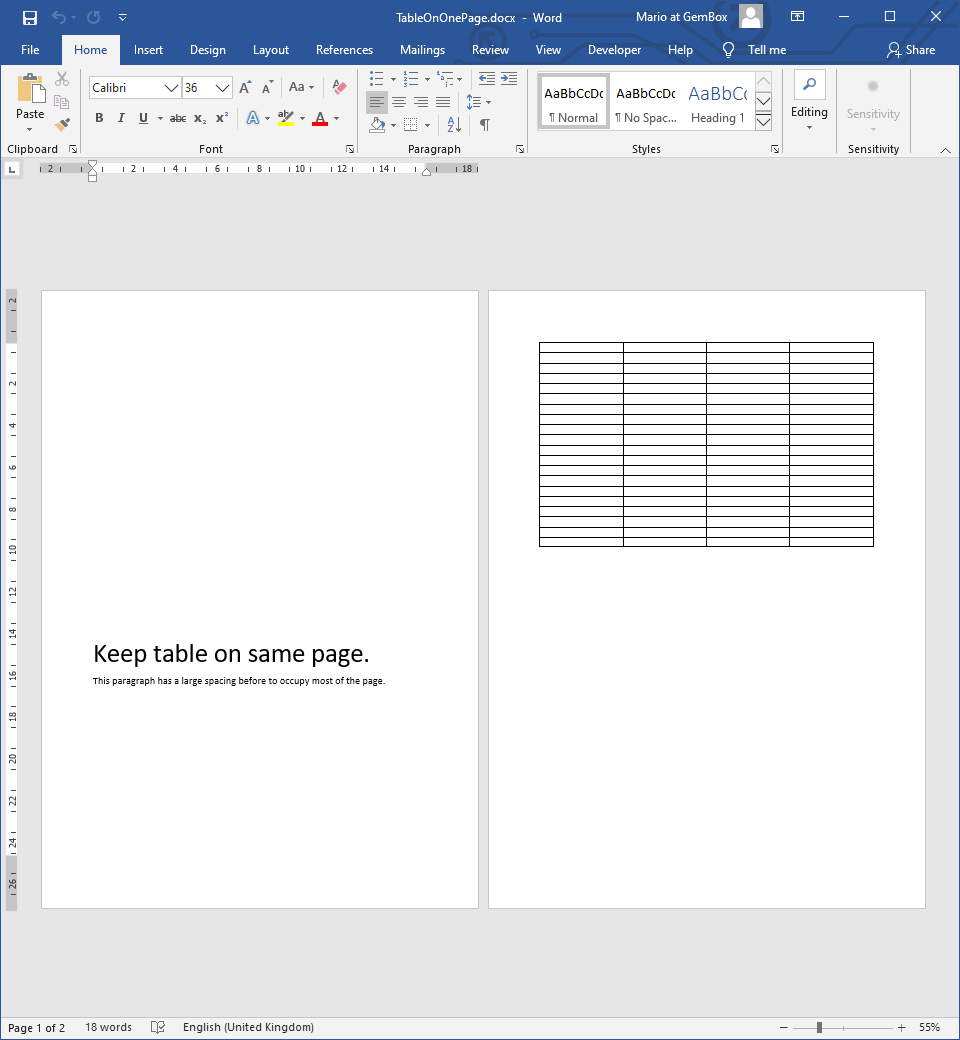
If you want to keep a whole table from breaking across pages, it's necessary to enable the ParagraphFormat.KeepWithNext option on every paragraph in the cells. With this formatting option, you can avoid page breaks inside the table, and as a result, the table will only split if it's too large to fit on the page itself.
The example below shows how to prevent a table from breaking across two pages in a Word document.

using GemBox.Document;
using GemBox.Document.Tables;

class Program
{
    static void Main()
    {
        // If using the Professional version, put your serial key below.
        ComponentInfo.SetLicense("FREE-LIMITED-KEY");

        var document = new DocumentModel();

        var section = new Section(document);
        document.Sections.Add(section);

        section.Blocks.Add(new Paragraph(document,
            new Run(document, "Keep table on same page.") { CharacterFormat = { Size = 36 } },
            new SpecialCharacter(document, SpecialCharacterType.LineBreak),
            new Run(document, "This paragraph has a large spacing before to occupy most of the page.") { CharacterFormat = { Size = 14 } })
        { ParagraphFormat = { SpaceBefore = 400 } });

        var table = new Table(document, 20, 4);
        table.TableFormat.PreferredWidth = new TableWidth(100, TableWidthUnit.Percentage);
        section.Blocks.Add(table);

        // If you were to save a document at this point, you'd notice that the last few rows don't fit on the same page.
        // In other words, the table rows break across the first and second page.
        //document.Save("TableOnTwoPages.docx");

        // To prevent the table breaking across two pages, you need to set the KeepWithNext formatting.
        foreach (TableCell cell in table.GetChildElements(true, ElementType.TableCell))
        {
            // Cell should have at least one paragraph.
            if (cell.Blocks.Count == 0)
                cell.Blocks.Add(new Paragraph(cell.Document));

            foreach (Paragraph paragraph in cell.GetChildElements(true, ElementType.Paragraph))
                paragraph.ParagraphFormat.KeepWithNext = true;
        }

        document.Save("TableOnOnePage.%OutputFileType%");
    }
}
Imports GemBox.Document
Imports GemBox.Document.Tables

Module Program

    Sub Main()

        ' If using the Professional version, put your serial key below.
        ComponentInfo.SetLicense("FREE-LIMITED-KEY")

        Dim document As New DocumentModel()

        Dim section As New Section(document)
        document.Sections.Add(section)

        section.Blocks.Add(New Paragraph(document,
            New Run(document, "Keep table on same page.") With {.CharacterFormat = New CharacterFormat With {.Size = 36}},
            New SpecialCharacter(document, SpecialCharacterType.LineBreak),
            New Run(document, "This paragraph has a large spacing before to occupy most of the page.") With {.CharacterFormat = New CharacterFormat With {.Size = 14}}) With
        {.ParagraphFormat = New ParagraphFormat With {.SpaceBefore = 400}})

        Dim table As New Table(document, 20, 4)
        table.TableFormat.PreferredWidth = New TableWidth(100, TableWidthUnit.Percentage)
        section.Blocks.Add(table)

        ' If you were to save a document at this point, you'd notice that the last few rows don't fit on the same page.
        ' In other words, the table rows break across the first and second page.
        'document.Save("TableOnTwoPages.docx")

        ' To prevent the table breaking across two pages, you need to set the KeepWithNext formatting.
        For Each cell As TableCell In table.GetChildElements(True, ElementType.TableCell)
            ' Cell should have at least one paragraph.
            If cell.Blocks.Count = 0 Then cell.Blocks.Add(New Paragraph(cell.Document))

            For Each paragraph As Paragraph In cell.GetChildElements(True, ElementType.Paragraph)
                paragraph.ParagraphFormat.KeepWithNext = True
            Next
        Next

        document.Save("TableOnOnePage.%OutputFileType%")

    End Sub

End Module

