Enhancing Spreadsheets with Custom Header and Footer Formatting in C#
Using C# to format headers and footers
Spreadsheets play an essential role when managing and manipulating data, but their built-in features may fall short in some areas. One such area is header and footer styles, where the built-in options in programs like Excel and Google Sheets are typically limited to basic text formatting.
To address this limitation, you can add custom code to allow users to change the border and background of their headers and footers for PDF, image, or print outputs. With this added functionality, users can customize the look and feel of their spreadsheets to suit their needs better. While this may seem like a small change, it can make a big difference in improving spreadsheets' usability and visual appeal.
In this article, you will learn how to set header borders and header and footer background colors in your spreadsheets, using GemBox.Spreadsheet C# library.
How to install the GemBox.Spreadsheet library
GemBox.Spreadsheet is a .NET component that allows you to create and edit Excel files in a straightforward way. You can easily install it by following these instructions:
Add the GemBox.Spreadsheet package using the following command from the NuGet Package Manager Console:
Install-Package GemBox.SpreadsheetAfter installing the GemBox.Spreadsheet library, you must call the ComponentInfo.SetLicense method before using any other member of the library.
ComponentInfo.SetLicense("FREE-LIMITED-KEY");
In this tutorial, you will use "FREE-LIMITED-KEY" to work in the free mode. This mode allows using the library without purchasing a license, but with some limitations.
You can check this page for a complete step-by-step guide to installing and setting up GemBox.Spreadsheet in other ways.
Setting header borders when exporting to PDF
You can add custom borders to header and footer elements in your spreadsheet using the GemBox.Spreadsheet library. This can improve the visual appeal of the spreadsheet by adding different border styles, colors, and widths. Borders can also improve the organization and clarity of data by visually separating the header and footer from the rest of the spreadsheet, making them easier to locate and understand.
You can follow these steps to create a spreadsheet and set custom header and footer borders when saving to PDF:
- Create a new
ExcelFileobject. - Add a new worksheet to the
ExcelFileobject and give it the name "Sheet1", and set the value of cell A1 in Sheet1 to "Hello World!". - Set the content of the center section of the default header in Sheet1 to "Title" and font size to 36 * 20.
- Set the content of the right section of the default footer in Sheet1 to "Created by GemBox.Spreadsheet".
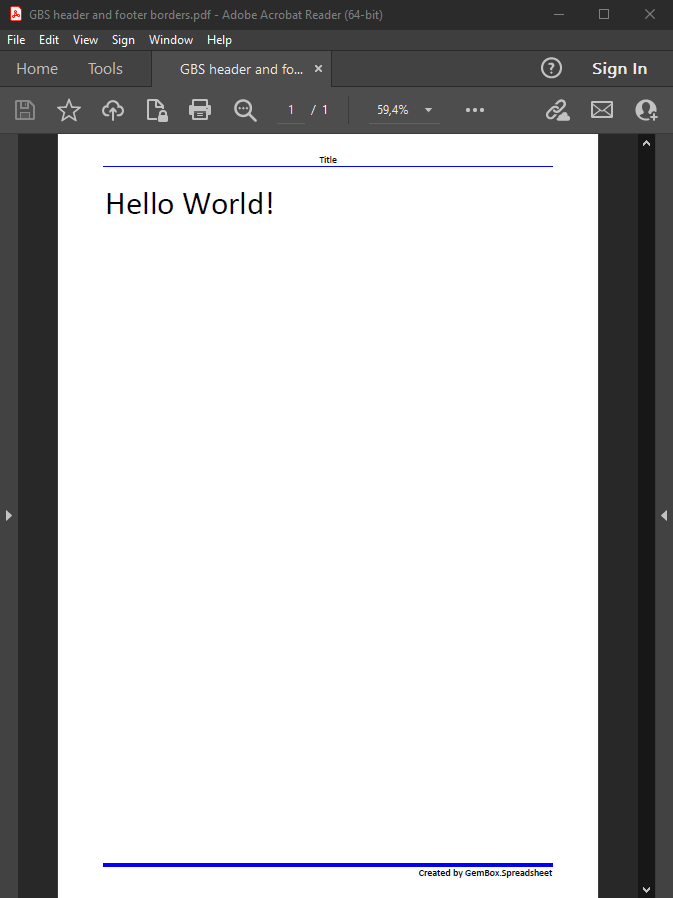
- Create a blue color from rgb values (0, 0, 255), and store the resulting color object in a variable named borderColor.
- Create a new
PdfSaveOptionsobject. - Set the bottom border of the header section in the PDF output to the color stored in borderColor with
LineStyle.Thin. Also, set the top border of the footer section in the PDF output to the color stored in borderColor withLineStyle.Thick. - Save the
ExcelFileobject as a PDF file named "sample.pdf", with the header and footer styles set by thePdfSaveOptionsobject created in steps 6 and 7.
using System;
using System.Text;
using GemBox.Spreadsheet;

class Program
{
    static void Main()
    {
        // If you are using the Professional version, enter your serial key below.
        SpreadsheetInfo.SetLicense("FREE-LIMITED-KEY");

        var excel = new ExcelFile();
        var sheet = excel.Worksheets.Add("Sheet1");

        var cell = sheet.Cells["A1"];
        cell.Value = "Hello World!";
        cell.Style.Font.Size = 36 * 20;

        sheet.HeadersFooters.DefaultPage.Header.CenterSection.Content = "Title";
        sheet.HeadersFooters.DefaultPage.Footer.RightSection.Content = "Created by GemBox.Spreadsheet";

        var borderColor = SpreadsheetColor.FromArgb(0, 0, 255);

        var options = new PdfSaveOptions();
        options.ExtendedOptions.HeaderStyle.Borders.SetBorders(MultipleBorders.Bottom, borderColor, LineStyle.Thin);
        options.ExtendedOptions.FooterStyle.Borders.SetBorders(MultipleBorders.Top, borderColor, LineStyle.Thick);

        excel.Save("sample.pdf", options);
    }
}
Imports GemBox.Spreadsheet
Module Program
Sub Main()
' If you are using the Professional version, enter your serial key below.
SpreadsheetInfo.SetLicense("FREE-LIMITED-KEY")
Dim excel = New ExcelFile()
Dim sheet = excel.Worksheets.Add("Sheet1")
Dim cell = sheet.Cells("A1")
cell.Value = "Hello World!"
cell.Style.Font.Size = 36 * 20
sheet.HeadersFooters.DefaultPage.Header.CenterSection.Content = "Title"
sheet.HeadersFooters.DefaultPage.Footer.RightSection.Content = "Created by GemBox.Spreadsheet"
Dim borderColor = SpreadsheetColor.FromArgb(0, 0, 255)
Dim options = New PdfSaveOptions()
options.ExtendedOptions.HeaderStyle.Borders.SetBorders(MultipleBorders.Bottom, borderColor, LineStyle.Thin)
options.ExtendedOptions.FooterStyle.Borders.SetBorders(MultipleBorders.Top, borderColor, LineStyle.Thick)
excel.Save("sample.pdf", options)
End Sub
End Module
After executing this code you should have an output file looking like in the following image:

Setting header and footer background color
Customizing the background color of header and footer elements with GemBox.Spreadsheet library can make important information stand out and add visual interest to a spreadsheet. This can be achieved easily with the right code. A custom background color can create a more visually appealing spreadsheet that is easy to read and understand.
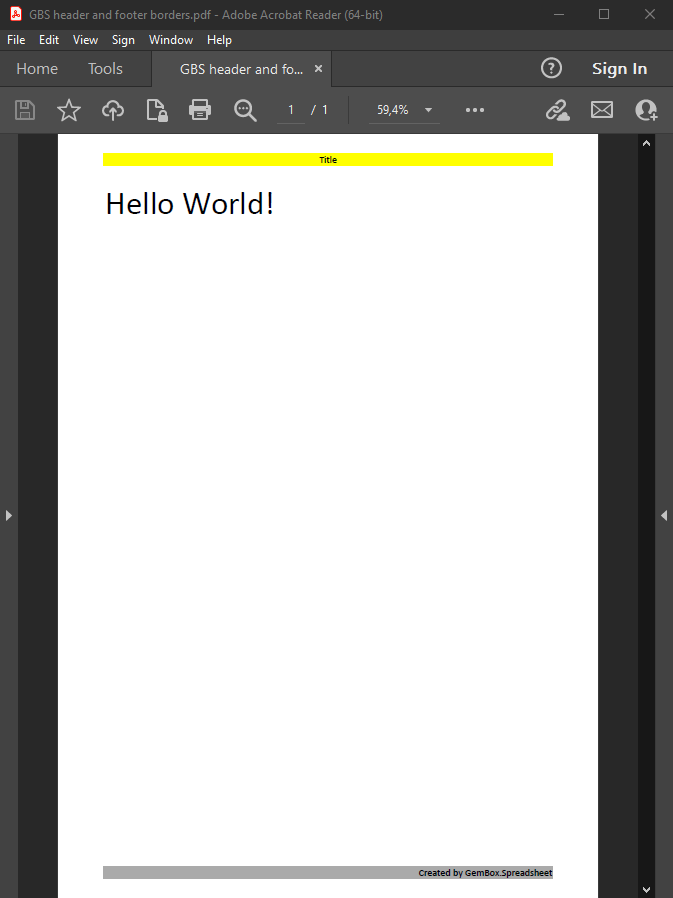
Changing the background color of header and footer elements can also improve the organization and clarity of data. For instance, a bright yellow background on a header element can emphasize the importance of the information contained within, while a light gray background on a footer element can visually separate it from the main body of the spreadsheet. Using background colors strategically can help to create a more organized and visually appealing spreadsheet, making it easier to work with.
Follow the next steps to set the background color for your spreadsheet headers and footers:
- Create a new
ExcelFileobject, and add a new worksheet named "Sheet1" to theExcelFileobject. - Set the value of cell "A1" in the new worksheet to "Hello World!" and font size to 36 * 20.
- Set the center section of the default header of the worksheet to "Title".
- Set the right section of the default footer of the worksheet to "Created by GemBox.Spreadsheet".
- Create a new
PdfSaveOptionsobject. - Set the background color of the header section in the saved PDF file to a yellow color (255, 255, 0). Set the background color of the footer section in the saved PDF file to a gray color (170, 170, 170).
- Save the
ExcelFileobject to a PDF file named "sample.pdf", with custom header and footer styles, using thePdfSaveOptionsobject created in steps 5 and 6.
using GemBox.Spreadsheet;

class Program
{
    static void Main()
    {
        // If you are using the Professional version, enter your serial key below.
        SpreadsheetInfo.SetLicense("FREE-LIMITED-KEY");

        var excel = new ExcelFile();
        var sheet = excel.Worksheets.Add("Sheet1");

        var cell = sheet.Cells["A1"];
        cell.Value = "Hello World!";
        cell.Style.Font.Size = 36 * 20;

        sheet.HeadersFooters.DefaultPage.Header.CenterSection.Content = "Title";
        sheet.HeadersFooters.DefaultPage.Footer.RightSection.Content = "Created by GemBox.Spreadsheet";

        var options = new PdfSaveOptions();
        options.ExtendedOptions.HeaderStyle.BackgroundColor = SpreadsheetColor.FromArgb(255, 255, 0);
        options.ExtendedOptions.FooterStyle.BackgroundColor = SpreadsheetColor.FromArgb(170, 170, 170);

        excel.Save("sample.pdf", options);
    }
}
Imports GemBox.Spreadsheet
Module Program
Sub Main()
' If you are using the Professional version, enter your serial key below.
SpreadsheetInfo.SetLicense("FREE-LIMITED-KEY")
Dim excel As New ExcelFile()
Dim sheet = excel.Worksheets.Add("Sheet1")
Dim cell = sheet.Cells("A1")
cell.Value = "Hello World!"
cell.Style.Font.Size = 36 * 20
sheet.HeadersFooters.DefaultPage.Header.CenterSection.Content = "Title"
sheet.HeadersFooters.DefaultPage.Footer.RightSection.Content = "Created by GemBox.Spreadsheet"
Dim options As New PdfSaveOptions()
options.ExtendedOptions.HeaderStyle.BackgroundColor = SpreadsheetColor.FromArgb(255, 255, 0)
options.ExtendedOptions.FooterStyle.BackgroundColor = SpreadsheetColor.FromArgb(170, 170, 170)
excel.Save("sample.pdf", options)
End Sub
End Module
The output of the execution of the code above should look like in the following image:

Conclusion
In conclusion, customizing header and footer styles in spreadsheets for printing or saving options can greatly enhance their presentation and functionality.
This level of customization can help users better organize and present their data, making it easier to read and understand, and creating a more polished and professional look for the spreadsheet's pdf, image, and print output.
Overall, adding custom code to support header and footer styles is a powerful way to enhance spreadsheets' functionality and visual appeal in these contexts.
